Quantcast
Channel: Gimme Lego
Viewing all 135 articles
Browse latest View live

Retro Space Revisited

$
0
0
I always enjoy building and writing about vintage space sets, and judging by the number of views that my Space Police post got last time out plus the comments on the Gimme Lego Facebook page it seems that I'm not the only one who enjoys wallowing in LEGO Space nostalgia. I've therefore decided to focus on another long-retired LEGO space set today, this time from the M-Tron subtheme.


The M-Tron subtheme of LEGO space consists of a total of eight sets released in 1990 and 1991. In addition to these eight sets, LEGO released instructions for an additional M-Tron model - 6862 Secret Space Voyager- which could be built by combining parts from three of the retail M-Tron sets. All of the M-Tron sets featured a vehicle of some description, and the majority of the sets utilized magnets, a first for LEGO Space I believe. In this review I'll be focusing on 6896 Celestial Forager, a mid-size M-Tron set released in 1990.


Unlike 6897 Rebel Hunter which I reviewed a few weeks back 6896 Celestial Forager is too small to merit a cardboard tray inside the box. As was the case for 6897 a laser grid forms the backdrop to an image of the completed build on the front of the box (above) although this time the grid is purple rather than green. Again similar to 6897 the vehicle is traversing a sandy planet surface, albeit at ground level this time. A price tag from departed UK retailer Woolworths is stuck over the LEGO logo on both the front and back of the box and indicates that the set retailed for £10.49 back in 1990. The back of the box (below) is split into a number of panels featuring alternate builds, and the inclusion of magnets is also highlighted.


The instruction booklet is in fact a thrice-folded A3-sized sheet which is printed on both sides. Although the cover panel (below) predictably shows an image of the completed build, here the vehicle is photographed from behind in contrast to the side-on view to be found on the front of the box. The instructions break the build into 14 principal steps, not including assembly of the minifigure.


The set contains a single minifigure, named by Bricklink as M-Tron with Airtanks. This minifigure has appeared in a total of ten sets, unsurprisingly all from the M-Tron subtheme given the prominent M-Tron logo printed in the middle of the red torso.... In addition to gracing this minifigure, the torso can also be found as a part of two other minifigures. All other components of the minifigure, namely the white legs with black hips, the yellow head printed with a standard grin pattern, the black helmet and airtanks, and the trans-neon green visor, have been widely distributed in many sets.


Below you can see the minifigure from the rear with the helmet removed. There's no printing on the back of the head or the torso.


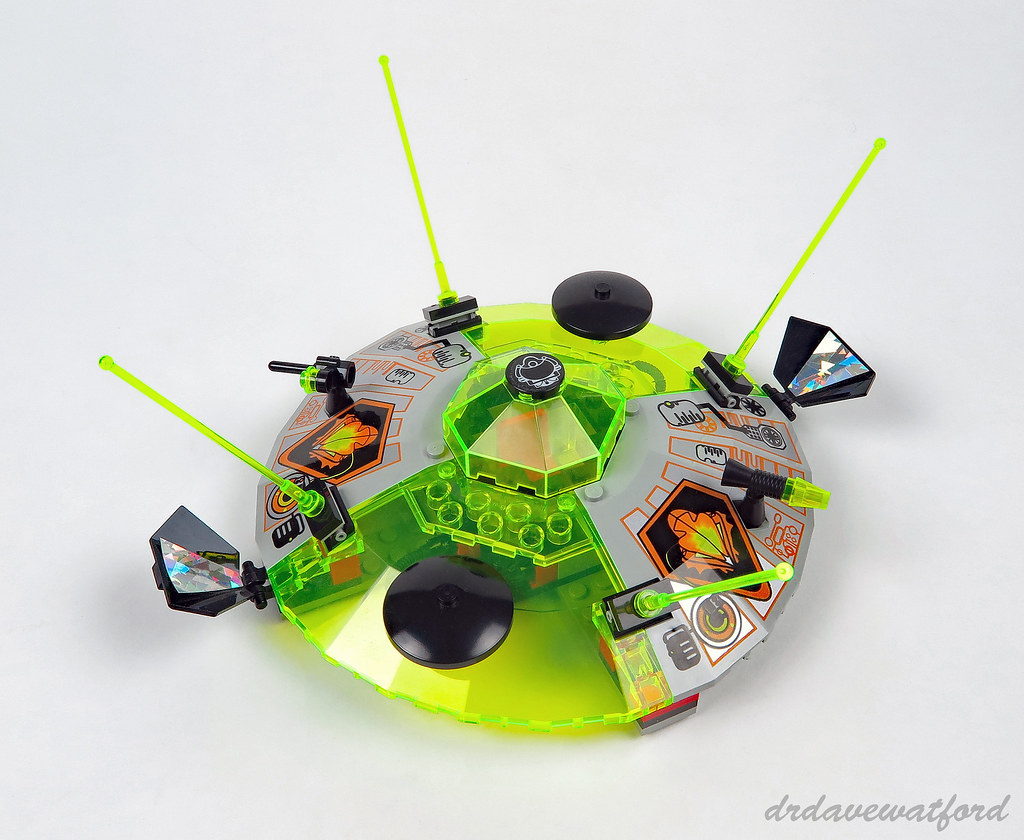
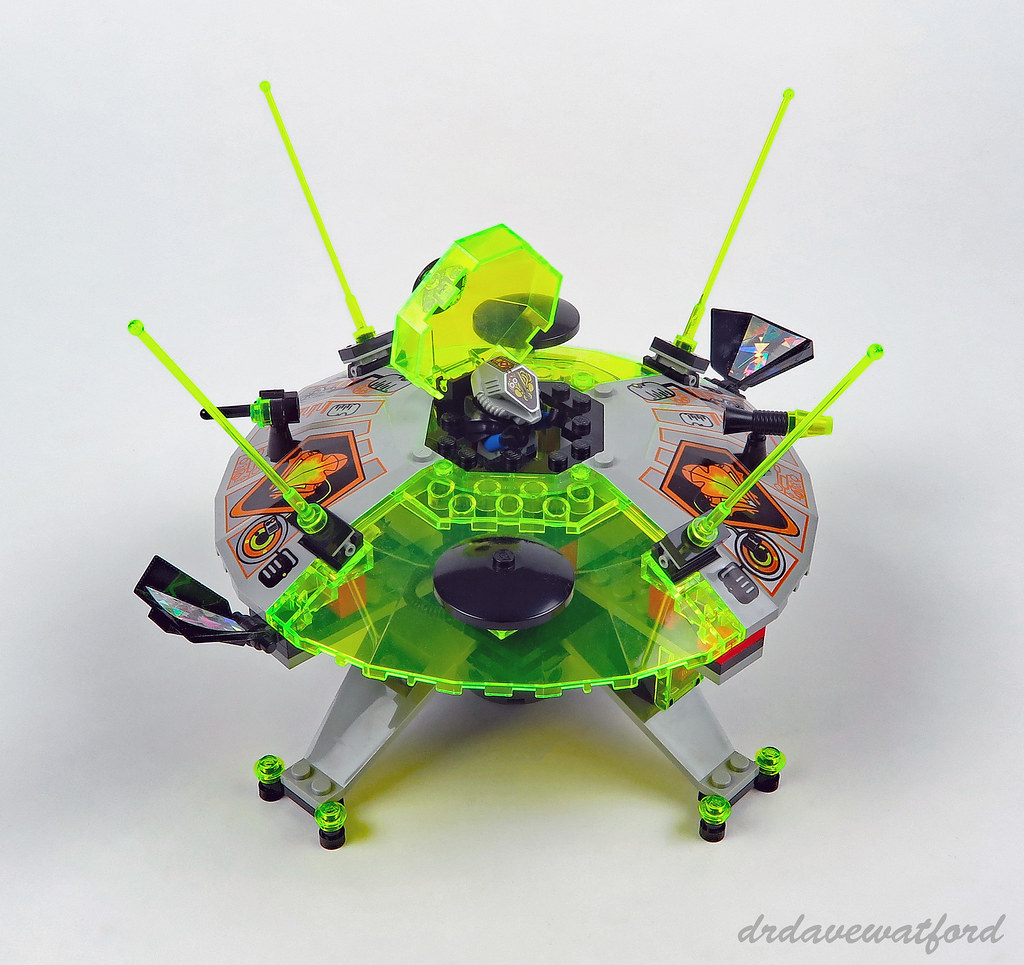
With the set's single minifigure assembled it's time to build the vehicle. The Celestial Forager consists of front and rear sections joined to each other by a pair of black 2 x 4 hinge plates with male and female articulated joints. There's also an upper bridge joining the front and rear sections, on top of which is a black inverted webbed 6 x 6 dish. The upper bridge features a faintly Heath Robinson-esque mechanism utilising a pair of 2 x 2 turntable plates together with a 1 x 2 Technic brick, a modified 2 x 2 plate with pinholes and 4L Technic axle to ensure that the two sections of the vehicle can still articulate at the hinge with the bridge in place. The front section of the vehicle includes a cockpit which incorporates a red cockpit space nose with printed M-Tron logo; this element has only appeared in a total of three sets including this one. A pair of chainsaw bodies are attached to the nose at an angle, one on either side; each sports a different 1 x 1 tile printed with a button design and a computer display design respectively. Both tiles have appeared in fewer than 10 sets in total. The vehicle's four black hard plastic 35mm x 31mm wheels attach to the chassis via red modified 2 x 2 bricks with pin.


The rear section of the vehicle is basically a trailer upon which a crane is constructed. A pair of black cylindrical magnets anchor the crane at its base. One of my most memorable brushes with LEGO cylindrical magnets was when I built 10030 Imperial Star Destroyer, and since then whenever I encounter them I recall that epic build. One of the magnets clicks into a 2 x 2 magnet holder which comes in a number of varieties; the 'short arm' variety found within this set can only be found in one other set, and the other varieties are only marginally more common. The crane's boom is formed from a 2 x 4 x 5 inclined support stanchion. A further cylindrical magnet is attached at the top of the boom, this time via a red 2 x 3 magnet holder. Cargo is provided in the form of a red 2 x 2 x 2 container; the variant supplied in this set has solid studs and has only ever appeared in five sets in this colour. The container has a printed light grey door which can only be found in seven sets, and inside the container are a pair of trans-neon green 1 x 1 round plates.


The main play feature of the set is the crane. As shown in the picture below, the boom can be lowered by disengaging the pair of magnets at the base of the crane, and the cargo container can be detached by disengaging the magnets at the end of the boom. As previously mentioned, the vehicle can bend in the middle thanks to the inclusion of a hinge.


Although I'd have to say that 6896 Celestial Forager falls some way short of being a "must-have" set, it's nevertheless an interesting step along the road from the earliest LEGO Space sets to present day offerings and it's well worth the £10 plus shipping that I paid for my boxed, complete copy a few years back. While that's admittedly inexpensive by current standards, the set can still be acquired for a relatively modest sum now - at time of writing complete boxed examples are available on Bricklink for as little as £15 plus shipping, which is less than what the set, originally priced at £10.49 back in 1990, would cost now if adjusted for inflation.


Lock Box

$
0
0
I'm not sure if it's just me but I get the feeling that there's been a marked increase in the number of non-retail LEGO sets over the past few years, that is to say sets that aren't available for purchase from LEGO brand stores, shop.lego.com or the usual LEGO retailers such as TRU, Argos etc.. Examples include the limited edition sets available for purchase at Comic Cons, such as the Dagobah Mini Build from the 2015 San Diego Comic Con, and LEGO employee gifts such as 4002014 LEGO HUB Birds and 4002016 50 Years on Track which theoretically aren't available for purchase at all but which can nevertheless be readily acquired via the likes of Bricklink and eBay. Then there are sets produced for specific companies and organisations; a number of UK cathedrals including Durham and St. Edmundsbury have produced limited edition sets, for example, while the Tropical Marine Centre has released 15 tropical fish models (example below) designed by Bright Bricks which is home to the UK's only LEGO Certified Professional.


One set linked to a specific organisation which has recently received some exposure is 2000451 The Panama Canal, a sizeable set released under the LEGO Education banner which was sold exclusively from the Panama STEM website. As luck would have it, the folks from Panama STEM recently got in touch and were kind enough to send me a copy of the set to review on Gimme LEGO. The set has now arrived, so here we go....


The box is a pretty plain affair, prominently featuring the LEGO education banner front and back plus an 8+ age recommendation. The front of the box (above) is dominated by an image of the completed build, and there are a couple of small panels below hinting at a couple of Technic mechanisms incorporated into the set. There's also a 'Canal de Panama' logo bottom right, alongside which is another logo incorporating the Spanish strapline "Tercer juego de eclusas". This translates as "third set of locks" and is a reference to the expansion of the Panama Canal which was inaugurated in June 2016. The back of the box (below) looks pretty similar to the front, although here the image of the completed build is accompanied by a line-up of five small ship models which are included in the set.  There are also a series of panels illustrating what looks like a LNG carrier traversing the Panama Canal lock system.


Having previously laid my hands on a number of non-retail LEGO sets, I can report that some of them fall quite short in the packaging stakes. Not this one, though - in terms of presentation it has the feel of a typical retail set. The box is sturdy and secured by way of tape seals, while inside the box the elements are sealed in a total of 20 bags, all but two of which are printed with a number from one to five. The box also contains five instruction booklets which are sealed inside a single bag alongside a small sticker (below).


The set includes a single minifigure (below). Despite having an overwhelmingly generic appearance, with no printing on the torso or legs, it's nevertheless exclusive to this set according to Bricklink. That having been said, all the elements making up the minifigure are readily available and have previously featured as a part of numerous other minifigures


You can see a rear view of the minifigure below. Neither the head nor the torso feature any back printing.


The build is split into five stages. Each stage contributes a single module to the final Panama Canal model and has its own instruction booklet complete with a stage-specific inventory of parts. Stage 1 (below) commences with construction of one of the set's five ships, after which attention shifts to the sturdy Technic frame which underpins the first Panama Canal module. The frame sits on a base of reddish brown plates and is built upon with basic light bluish grey and blue bricks and plates before being topped off with blue tiles to represent water and some green plates to represent the banks of the canal. A couple of tan gears are housed in a brick-built structure which projects forward from the main part of the module. The teeth of these gears mesh with some gear racks below; these gear racks are attached to a pair of dark bluish grey lock gates, and when the gears are rotated the lock gates slide forwards and backwards, thus closing or reopening the main waterway.


Subsequent modules follow the same basic formula - a Technic frame is constructed on a base of reddish brown plates, simple Technic mechanisms are bolted on to the frame, and blue tiles and green plates provide some basic surface decoration. In addition to the inclusion of a pair of lock gates which are controlled by the same gear and gear rack mechanism described previously, Stage 2 also incorporates a mechanism which raises and lowers the water level, indicated by 2 x 4 blue tiles. This mechanism is activated by winding the black crank at the front of the module; the crank drives a succession of interlocking gears that ultimately mesh with a pair of gear racks which change the water level . The set's solitary sticker is applied to a white 2 x 4 tile at this stage of the build where it forms the sign you can see perched at the top of the module (below).


Stage 3 of the build involves construction of the third module which you can see below. This is very similar to the second module, featuring the same Technic mechanisms, lock gates and adjustable water level. Its foundations incorporate additional reddish brown elements which raise the module by two bricks in height compared with its predecessor, however, and there's no "Canal de Panama" sign.


Stage 4 of the build involves construction of the fourth canal module (below), an activity which provokes a distinct feeling of deja-vu as module four is markedly similar to modules two and three; it sits a further two bricks higher than module three, and features decoration in the form of a tower on top, but is otherwise basically the same in terms of its reddish brown base, underlying Technic frame and the mechanisms that it incorporates.


And so to Stage 5 and with it some welcome variety. The final module of the canal is assembled during this stage of the build, together with the four remaining vessels. The ships are constructed first, starting with a LNG carrier, followed by a container ship, a cruise liner and finally what looks like a reefer ship; one of the few uncommon elements included in the set makes an appearance at this point, namely a white minifig telescope which has only previously appeared in seven sets in this colour and which forms the masts of the reefer ship.


With all five modules now built all that's left to do is join them together with Technic pins and we're done. Looking at the completed build (below) it's clear that aesthetics have taken a back seat in the design process, with the desire to include functional and robust mechanisms to practically demonstrate the workings of the canal's system of locks understandably taking priority. Certainly the mechanisms make it easy and fun to learn, and the model quickly engaged my 9-year old who enjoyed experimenting with the completed build and now has a solid understanding of the subject matter, so mission accomplished from an educational perspective I guess.


In summary, this is an interesting set by virtue of the subject matter and rarity, and it has obvious educational value. On the downside, the 1,184 elements making up the set, and indeed the set's single minifigure, are very basic and unlikely to make the set appeal much as a parts pack, and it's not a particularly interesting build either on account of the degree of repetition. It also has to be said that the US $249.95 retail price is eye-watering, even if it does include worldwide shipping. In mitigation, 50% of all profits are donated to a non-profit organisation which promotes STEM (Science, Technology, Engineering, and Mathematics) education in Panama, but the fact remains that unless you're teaching large numbers of kids this set seems like a prohibitively expensive way to impart knowledge.


In practice, any discussion of the set's value may end up being academic as at time of writing the Panama STEM website shows the set as being sold out with no indication of whether they'll get more stock. Given my reservations about the set, however, I don't think that should concern the majority of LEGO fans whose money would probably be better spent elsewhere. Definitely a set for collectors with big budgets and educators only I reckon.


Thanks to Panama STEM for providing Gimme LEGO with a review copy of the set. All opinions expressed in this review are my own.

The Gimme LEGO Awards 2017

$
0
0
Welcome to my annual round up of the best and worst of the year from an AFOL perspective. This is the seventh consecutive year that I've published these awards, and I have to confess to approaching the 2017 awards with a mixture of excitement and trepidation as I'm struggling to recall a year which has featured quite so many standout sets in some categories. As ever this is obviously a personal take on the highlights and lowlights, so if you disagree with any of my selections then please feel free to make your case in the comments below....

1. Best Theme

Last year's winner: Ninjago

2017 winner: The LEGO Ninjago Movie

After bagging my 2016 theme of the year award I didn't think that Ninjago managed to maintain the same lofty standards this time round. That however opened the door for a new theme to steal in and grab the crown, and truth be told the LEGO Ninjago Movie theme actually takes the 2017 award by quite a distance. Consisting of a total of 29 retail, magazine and promotional sets, the theme takes full advantage of the varied and vibrant subject matter provided by the movie, serving up a high quality selection of sets for kids and AFOLs alike.


When it comes to any theme the flagship sets will inevitably attract most of the attention, and in the case of the LEGO Ninjago Movie theme the superb 70620 NINJAGO City (above) has certainly taken its share of the plaudits. What's at least as impressive however is the way that the theme manages to serve up a number of excellent sets at a variety of different price points; at the lower end, for instance, 70608 Master Falls (below) features an attractive and detailed structure plus four minifigures for just £24.99/$29.99, and pretty much whatever your budget you'll find a worthy offering.


One aspect of the theme which greatly appealed to me is the focus on mechs, some of which are excellent. 70612 Green Ninja Mech Dragon (below) is both great to look at and packs a ton of playability, while of the more orthodox mechs on offer, 70615 Fire Mech (reviewed by me here) is imposing, stable and eminently posable. As one might expect in an action theme there's a predictable focus on vehicles, but a number of sets feature location-based subject matter so there really is something for everybody.


Aside from the widely-available retail sets the theme also features a mixture of other offerings including some desirable polybags and other assorted promo items to keep collectors on their toes. Overall, when you consider the variety of offerings and consistent quality across the theme, plus the presence of two genuine set of the year contenders in 70620 NINJAGO City and 70618 Destiny's Bounty (below), it made the choice of the LEGO Ninjago Movie as theme of the year pretty straightforward.


Honourable mention: LEGO Ideas. Another theme to serve up a couple of set of the year contenders, namely 21309 NASA Apollo Saturn V and 21310 Old Fishing Store, was LEGO Ideas. That's particularly impressive, given that there were only four releases under the LEGO Ideas banner in 2017. It's probably fair to say that this was a breakout year for Ideas - we've had some excellent releases in previous years, but this was the year that LEGO decided to loosen the shackles and push the boundaries in terms of part counts as well as excellent design.


If I'm honest, I think it's unlikely that Ideas will ever win the Gimme LEGO 'Best Theme' award outright - too many of the projects that get the thumbs up for release are basically licensed fan service in search of a set and they leave me completely cold. If however we continue to get a couple of real gems every year like we have for the past few years then I'll be delighted.

Honourable mention #2: Star Wars. Despite LEGO Star Wars being the catalyst for my return to the LEGO fold a decade ago I've been pretty critical of the LEGO Star Wars theme for some time now. High prices, a profusion of lazy remakes and some dubious design decisions have blighted the LEGO Star Wars theme for as long as I can remember, and despite being a big Star Wars fan I've struggled to retain much enthusiasm for the theme.


I'd be lying if I claimed that all in the LEGO Star Wars garden was suddenly rosy in 2017, but I've certainly found more to like in the selection of sets on offer this year. Part of this is undoubtedly down to the availability of new and interesting subject matter upon which to base sets, but the theme has also featured some genuinely desirable and well-designed sets this year at a variety of price points.


Examples of outrageous pricing unfortunately remain, and the theme continues to be over-dependent on remakes and bloated by too many sets, but I'm finally able to muster some enthusiasm for LEGO Star Wars again, and that's definitely a good sign.


2. Most Disappointing Theme

Last year's 'winner': LEGO Classic

2017 'winner': No outright winner

No one theme stood out in this category, although a few themes perhaps fell slightly below expectations this year. Technic, for instance, was absolutely outstanding in 2016, and with this year being the 40th anniversary of the evergreen theme I would have expected LEGO to pull out all the stops to celebrate; as it turned out, the flagship sets in particular were perhaps not up to the lofty standards set in 2016, and the daddy of them all, 42070 6x6 All Terrain Tow Truck (below), was horribly overpriced to boot.


Also disappointing was the way that Dimensions fizzled out in 2017. I've enjoyed playing the game on XBOX One and collecting the multitude of expansion packs, and having invested so much in the Dimensions experience it felt like a real kick in the teeth when Warner Bros pulled the plug on it just two years into its planned three year run. I've lost count of how many unlikely properties have been immortalised in LEGO as a result of Dimensions - Beetlejuice, Portal and the A-Team to name just three - and the theme will be missed, by me at least.


3. The "Medieval Market Village" award for Best Non-Licensed Set

Last year's winner : 10251 Brick Bank

2017 winner: 21310 Old Fishing Store

As mentioned above, 2017 was the year that LEGO Ideas started to push the boundaries in terms of set size. My pick for best non-licensed set was a major beneficiary of this, the sublime Old Fishing Store. I can remember being very impressed with the original concept posted on the Ideas website, but thinking that it unfortunately had no chance of being green-lit by LEGO. My surprise at subsequently learning that the project had in fact been approved after all was matched by my delight at how faithful to the highly detailed original concept the retail set turned out to be.


Most of the past winners of the Gimme LEGO Best Non-Licensed Set award have been Modular buildings, so it's fitting that the Old Fishing Store features incredible levels of detail both inside and out that stand comparison with any of the modulars. While building the set I couldn't believe quite how much time was spent assembling the interior and exterior fixtures and fittings; indeed, such is the level of detail that decorating the interior can get quite fiddly at times and is occasionally frustrating, but it's worth it in the end.


In addition to looking amazing the Old Fishing Store includes a whole host of rare, and in some cases unique, elements. Those builders planning to cannibalise the set for parts can also expect a generous helping of sand green tiles and SNOT bricks to use in their own creations. Even the included minifigures (below) are worthy of mention since they're all unique to the set and a couple of them incorporate new dual-moulded legs and exclusive torso prints.


The Old Fishing Store is one of those rare sets that has remained proudly and prominently on display in my house ever since I finished building it. It was fun to build and looks amazing; if it's a taste of the kind of sets that we can expect from the LEGO Ideas theme in years to come then I for one will be absolutely delighted.

Honourable Mention: 10255 Assembly Square. If you're going to make a fuss about an anniversary then you need to make sure you don't drop the ball in the process. While the Technic 40th anniversary selection felt a bit underwhelming, no such criticism can be levelled at 10255 Assembly Square which turned out to be a fitting 10th anniversary tribute to LEGO's much-loved Modular building line.


I think it looks wonderful - three attractive, distinct buildings which dovetail beautifully and form the centrepiece of a bustling scene. All the expected Modular tropes such as the appearance of rare colours, ingenious parts usage and extravagant detail both inside and out are present and correct in abundance; my favourite example of clever parts usage is the incorporation of black excavator buckets in the roof of the sand green flower shop. As an added bonus, the standard 32 x 32 Modular footprint has been expanded to 32 x 48 for this set, and even then it's hard to see how anything else could have been crammed in.

Other contenders:21309 NASA Apollo Saturn V, 17101 Creative Toolbox, 10257 Carousel.


4. Best Licensed Set

Last year's winner: 75827 Firehouse Headquarters

2017 winner: 70620 NINJAGO City

Following in a tradition of unexpected left-field releases established by the likes of MetalBeard's Sea Cow and the Temple of Airjitzu in previous years, 70620 NINJAGO City was announced in June of this year and it frankly blew me away.


I literally shook my head in wonderment at the retina-searing riot of colours and different building styles when I first saw the set 'in the flesh'. Such is the eclectic nature of the design that you'd think it shouldn't work, but it somehow manages to hang together as a cohesive whole and looks amazing. Furthermore, as a consequence of the multitude of different zones shoehorned into the set it must surely be one of the most varied and entertaining builds of recent times; it's at times reminiscent of constructing 10188 Death Star and the experience of building a number of stylistically diverse areas such as the garbage compactor, the prison block and the Emperor's throne room.


As you'd expect from a LEGO Ninjago Movie set 70620 NINJAGO City scores highly from the perspective of playability thanks to the incorporation of countless little vignettes, not to mention a number of interactive mechanisms such as an elevator, a cash machine, a sushi conveyer belt and a crab grill. The set is also replete with rare elements, some of them appearing for the first time, and similar to the Modular buildings there's an impressive array of advanced building techniques in evidence, plus some unexpected and ingenious parts usage.


It always feels a bit odd talking about value for money when discussing a toy costing hundreds of pounds, but at 4,867 elements and retailing for £259.99 / US$299.99 / 299.99€ I have to say that NINJAGO City feels pretty reasonably priced to me. Overall, it's hard to imagine any LEGO fan failing to enjoy building this set, and it's my licensed set of the year by some distance.

Honourable Mention: 75098 BB-8. This set was one of the main reasons that I started to rediscover some love for the LEGO Star Wars theme in 2017. That LEGO found a way to release a decent-looking version of BB-8 and not charge the earth for it was impressive enough, but the fact that the designer also somehow managed to incorporate a number of play features into the build without compromising the appearance means that it's up there as one of my very favourite sets of the year - excellent!


Other contenders: 70618 Destiny's Bounty, 75192 Millennium Falcon


5. The "Phantom Menace" Award for Most Disappointing Set

Last year's winner: 75098 Assault on Hoth

2017 winner: 10256 Taj Mahal

OK, so a potentially controversial pick here. I know that many will disagree with this award, particularly those who missed out on this set the first time it was released, in which case feel free to have your say in the 'comments' section below if you feel so inclined....


Unless you've been hiding under a rock for the past few months you'll probably be aware that this set is a re-release of 10189 Taj Mahal which appeared on shelves back in 2008. At 5,922 elements the original Taj Mahal set was at that time the largest set that LEGO had ever released, a crown it proudly held on to until the release of 75192 Millennium Falcon some nine years later. Following its retirement in 2010, the aftermarket price of the original Taj Mahal set rose steadily, with sealed examples eventually selling for thousands of pounds. The set came to be viewed as one of a select group of all-time classics alongside the likes of 10182 Cafe Corner and 10179 Millennium Falcon, and it was one of the sets that helped to fuel the LEGO investment boom.


Given the degree of price speculation you might think that the unexpected re-release of the original Taj Mahal set in a new box would have been roundly welcomed by AFOLs, but picking through the comments of LEGO fans within the various online communities it appears that reaction is definitely split. Many AFOLs who missed out on 10189 Taj Mahal are predictably supportive of the re-release, but others fear that the value of their LEGO collections will decrease as a result of such re-releases, arguing that it's the healthy LEGO resale values which have given them the confidence to build their collections. Others are resentful that, having saved their pennies and eventually accumulated enough to pay the inflated aftermarket prices for the Taj Mahal, they're now seeing others buy an identical re-release for a fraction of what they paid for theirs. I can see some logic in the argument that re-releases such as this would impact the LEGO aftermarket, potentially making AFOLs more cautious about spending the amounts of money that they currently do on big, adult-oriented sets at retail; this would have a knock-on effect on the sale volume of such items, which in turn might make LEGO less likely to release such sets in the future.


For all the arguments above, however, there's a more compelling reason why 10256 Taj Mahal is the most disappointing set of the year and that's the fact that it's first and foremost a massive wasted opportunity. To be frank, the LEGO Taj Mahal, while undeniably huge and imposing, nevertheless falls some way short by recent design standards. The availability of a myriad of new elements since 2008, plus the tendency for set designers to increasingly embrace more advanced building techniques in official releases, presented the opportunity for LEGO to produce a significantly superior version of the set, similar to what they did with 75192 Millennium Falcon earlier this year. Instead LEGO took the easy option and just re-released the old set in a new box, throwing in a brick separator to sweeten the deal. That's just lazy, and I expect better from them. What a shame.


6. Best Minifigure

Last year's winner: Gizmo and Stripe

2017 winner: Rocket Boy

As noted in previous years, the quality of LEGO minifigures is now so high that trying to make an objective judgement of which is best has become next to impossible. The task is further complicated by the sheer number of minifigures released by LEGO in 2017 - a total of 830 according to Brickset, which is the most that LEGO have ever released in a single year. Even though that's a serious motherlode of minifigures to look through, there was one clear standout for me and that was Rocket Boy (below) which was released in May of 2017 as part of the seventeenth series of Collectible Minifigures (CMFs).


I suspect that when it comes to the novelty CMFs such as Rocket Boy, Corn Cob Guy and other guys wearing novelty suits you either love 'em or hate 'em, and I'm firmly in the former camp. I continue to be amazed that despite churning out well over 20 series of CMFs including theme-specific offerings LEGO are still able to come up with fresh, original ideas for further CMFs. Certainly Rocket Boy is a gem, perfectly timed to ride the wave of Classic Space nostalgia that continues to wash over parts of the LEGO fan community. The icing on the cake with this minifigure is something you can't even see in the picture above, namely a Classic Space torso in light bluish grey (image below from Rebrickable) which is unique to the minifigure; with so many LEGO fans building Classic Space MOCs these days this torso is a welcome gift to the community and will I suspect be in high demand.


Honourable Mention: 4-LOMCommander RaggmunkGeneral GargPrincess Leia, Corn Cob Guy 


7. The "Better than Expected" Award

Last year's winner: Elves

2017 winner: LEGO Star Wars.

As previously mentioned, 2017 was the year that I finally started to feel more love for the LEGO Star Wars theme again after way too many years spent turning my nose up at the product line-up and scowling at all the remakes.


Pleasingly, I thought that most of the 2017 System Scale Star Wars sets had something to commend them, although there were admittedly a few dogs rubbing shoulders with them including the baffling 75177 First Order Heavy Scout Walker. I've already waxed lyrical about 75187 BB-8 which was for me the best Star Wars set of the year, and while the two 2017 UCS sets were remakes they both improved on the previous versions enough to make them worthwhile purchases for LEGO Star Wars fans. Furthermore, while I admittedly found it hard to get too excited about the clutch of 2017 Microfighters sets I did think that some of the Buildable Figures were great and was delighted that this particular subtheme took its first step into vehicles with the impressive 75532 Scout Trooper & Speeder Bike set (below).


A decent year for Star Wars sets, then. Here's hoping that the 2018 sets are at least as good....

Honourable mention: The LEGO NINJAGO Movie theme. I didn't have particularly high hopes for the LEGO Ninjago Movie sets. I figured that they'd sell well regardless of their quality thanks to all the free advertising that the movie would provide, and might therefore be a bit "by the numbers". I also wasn't especially enthused by the LEGO Batman movie sets and thought we might get a similarly lukewarm Ninjago Movie selection. As you'll have gathered from my comments above, however, it's fair to say that my doubts were answered in emphatic fashion....


8. Most Welcome LEGO-Related Announcement

Last year's winner: London Leicester Square LEGO Brand Retail Store and pre-opening event

2017 Winner: 60 Years of the LEGO Brick 

OK, so not an announcement as such, although I've been able to sneak the 60th anniversary celebrations into this category by virtue of the recently-announced 40290 60 Years of the LEGO Brick set (below) which will be given away free during 2018 with qualifying purchases at brand stores and shop.lego.com.


LEGO previously celebrated 50 years of the LEGO brick with the release of two 50 year anniversary retail sets in the form of 5522 Golden Anniversary Set and 10184 Town Plan (below). The latter was a wonderful re-imagining of a classic set, and I'm keeping my fingers tightly crossed that LEGO freshens up a couple more classics to celebrate 60 years of the LEGO brick. Indeed, there's some speculation that there will be a whole series of 60 year anniversary sets, although if true it still remains to be seen whether these sets turn out to be basic brick boxes, remakes of classic sets or something else.


9. Gimme LEGO Reader's Choice Award

Last year's winner: 71040 Disney Castle

2017 winner: You choose!

Think you can do better? OK, you've seen my choices so now it's your turn. At the top of the page on the right of the screen you'll see a selection of LEGO sets which I consider to be some of the best that 2017 had to offer. Please carefully peruse the list and vote for your favourite set of 2017; if your favourite isn't on the list then select 'None of the above' and leave a comment below or send me an e-mail via the contact button letting me know which set you think is the best of 2017. At midnight on 14th January 2018 the poll will close and we'll have our winner.... If you're reading this on a device which isn't displaying the poll as described then click "view web version" at the bottom of the page in order to see the nominations and cast your vote. Thanks for participating!

Previous Gimme LEGO Awards: 2016, 2015, 2014, 2013, 2012, 2011

"And the Gimme LEGO Readers' Choice Award for Best Set of 2017 goes to...."

$
0
0
....21309 NASA Apollo Saturn V.


For me, 2017 was a high water mark in terms of truly outstanding sets - I reckon that there were as many as six 2017 sets which would potentially have strolled to victory in the Gimme LEGO Readers' Choice Award any other year. I was therefore fascinated to see which set Gimme LEGO readers would choose as their favourite, and in the end Saturn V won surprisingly comfortably.


While the ease of the victory might have been unexpected it's certainly no surprise that the set has attracted so much adoration. Measuring a whopping 100cm in height, it almost goes without saying that the completed build is huge and imposing, but there's also a wonderful attention to detail evident throughout. The overall shaping and texturing of the exterior is commendably faithful to the subject matter right down to the inclusion of unique printed elements, and the set also includes appropriately scaled lunar, service and command modules and even a pair of suitably decorated astronaut microfigures (above). Furthermore, the build is surprisingly stable and can be handled without fear of distintegration which is no mean feat given its cylindrical shape. The icing on the cake is the price - a very reasonable £109.99 / $119.99 / 119.99€ for a one metre tall model made up of almost 2,000 elements.


It's quite clear that this superb set has caught the imagination of the LEGO fan community - the set's almost perpetual 'sold out' status on shop.lego.com up until recently is testament to that - and it's a worthy winner of the 2017 Gimme LEGO Readers' Choice Award. Congratulations to Felix Stiessen and Valérie Roche who submitted the original Saturn V proposal to LEGO Ideas, and also to the team of LEGO designers who turned the proposal into a truly memorable retail set - we salute you!


The overall Readers' Choice Award rankings are shown below together with the number of votes polled by each of the sets. Saturn V ended up polling around a third of the votes, a relatively low winning total which reflects the intense competition faced by the set. My personal favourite, 70620 NINJAGO City, initially looked like it would run Saturn V close but ended up falling short by around 20 votes, finishing as runner up with a little over a quarter of the votes. Further back the Old Fishing Store, Destiny's Bounty and the new UCS Millennium Falcon were locked together in the rankings and ended up polling less than 10% of the vote each. I did wonder whether 17101 Creative Toolbox might turn out to be a dark horse - it's received some strong reviews and has been the subject of an active discussion thread over at the Brickset Forum for some months now - but in the end it brought up the rear with just a single vote.


Many thanks to all of you who voted, and thanks as ever to Brickset for publicising the poll.


Don't mess with the Fett....

$
0
0
Another Comic Con, another desirable exclusive.... This time the location was New York City and the event was the 2017 New York Comic Con (NYCC) where a few hundred lucky attendees were able to purchase a copy of 41498 Boba Fett and Han Solo in Carbonite, an exclusive Brickheadz set. I'm generally able to resist the lure of LEGO Star Wars exclusives, contenting myself with the Star Wars retail sets as discussed here; occasionally, however, a Star Wars exclusive comes along that I can't ignore and this set is one of those. And so it was that I dived into eBay and took the plunge on a copy of the set which arrived from the U.S. a couple of weeks later.


The sturdy packaging features an outer box (above) that's considerably thicker and more robust than that of the retail Brickheadz. Cutting the twin paper seals at the base allows the outer box to slide up and off, revealing a similarly robust black inner box (below). The front of the outer box features a shot of Boba Fett and Han in Carbonite without their display stands, beneath which are decorative rows of black bricks running along the bottom edge of the box which also appear on the retail set boxes.


The back of the box (below) features an alternative view of Boba Fett and Han. There's also stylised text identifying the set as a New York Comic Con exclusive, beneath which is a picture which illustrates the use of Boba Fett's display stand. I was pleased that I managed to acquire a copy of the set which had been signed by set designer Marcos Bessa. Marcos is rapidly becoming one of LEGO's most well-known set designers, having been responsible for a number of high profile sets including 71040 Disney Castle and 75827 Firehouse Headquarters as well as this Comic Con exclusive and a number of other Brickheadz.


The inner box contains two sealed bags of elements, one for the Boba Fett build and the other for Han. There are also two instruction booklets, one for each build. There's no sticker sheet.


Each booklet measures approximately 15cm x 10cm and is bound by way of a pair of staples down the left side. The booklet containing the building instructions for Boba Fett (cover above) is the shorter of the two at only 40 pages, while Han's booklet (cover below) weighs in at 52 pages in length. Both booklets incorporate a 2-page inventory of elements at the back specific to the individual build. The page backgrounds in both booklets are black, lending a stylish appearance to the building instructions which are clear and easy to follow.


The set includes a number of printed elements (below), all of which I assume are unique to the set. I built Boba Fett first. Construction follows the standard Brickheadz blueprint which is nicely summarised here. As is the case with other Brickheadz a handful of light bluish grey modified 1 x 2 x 1 2/3 bricks with studs on 1 side feature prominently in the construction of a central core. These are accompanied by a variety of other SNOT bricks including a reddish brown modified 1 x 1 x 1 2/3 brick with studs on one side which at the time the set was released was only appearing for the second time in this colour. The core of SNOT bricks provides abundant attachment points for the external detailing which brings the Brickheadz to life.


Fett's shoulders are made up of a pair of bright light orange double cheese slopes, one of which is printed with a mythosaur skull. This Mandalorian symbol has become synonymous with Boba Fett. The upper body utilises a number of dark green 1 x 1 tiles, and immediately above the waist is a printed reddish brown curved 4 x 1 double slope with no studs which represents a tool belt with 4 pockets. A dark green modified 3 x 2 plate with hole, appearing in a set for only the eighth time in this colour, attaches below the waist and presumably represents Fett's armoured codpiece, while his tiny legs are made up of a stack of small plates including bright light orange 1 x 1 plates to represent his knee pads.

Much of the build is concerned with crafting Fett's iconic helmet. The visor consists of a black 1 x 4 tile with a dark red print, while a pair of sand green modified 1 x 2 plates with door rail form part of the top of the helmet; these are only appearing in a set for the fifth time in this colour. In the movies, Boba Fett's helmet has a number of distinguishing features including a dent at the front and some yellow kill stripes on the left side. These have been reproduced by way of printed elements; the curved front of his helmet is formed from a couple of sand green 2 x 2 curved slopes, one of which is printed with the dent pattern, while the yellow kill stripes are printed on a sand green 2 x 4 tile. Unprinted sand green 2 x 4 tiles form the right side and back of the helmet, while the top of the helmet is crafted from more sand green 2 x 2 curved slopes. The triangular plates at the front of the helmet are made up of dark green left and right 2 x 2 wedge plates which haven't previously been available in this colour.


At the rear, a dark tan 3 x 3 wedge plate and an uncommon dark tan 1 x 3 plate make up the bottom of Fett's brick-built cloak; the cloak is decorated with a couple of medium dark flesh 2 x 1 curved slopes which have only previously graced a single set. A light bluish grey modified 1 x 2 x 2/3 brick with studs on the sides forms the core of Fett's sizeable jetpack; this is surrounded by various sand green elements including more modified 1 x 2 plates with door rail. The two jet nozzles, which are represented by sand green 1 x 1 cones, are attached to the body of the jetpack by black 1 x 1 round plates with 1L bar that have only previously appeared in three sets. A flat silver harpoon passing through a pair of sand green 1 x 1 cones forms the missile attached to the top of the jetpack.
With the jetpack completed and attached to Boba Fett's back, all that's left to do is assemble his blaster which is crafted from six elements, and build the display base featuring the printed black 2 x 4 souvenir tile.


With Boba Fett now built it's time to assemble Han Solo in carbonite. This build incorporates more printed elements than is immediately evident. As was the case for Boba Fett, I suspect that all of the printed elements are currently unique to the set. In true Brickheadz style the core is predominantly populated by SNOT elements, although in this case the elements concerned are a variety of brackets as opposed to the usual SNOT bricks. A couple of 2017 sets including 70620 NINJAGO City included a black modified 1 x 3 plate with 2 studs a.k.a. double jumper which hadn't previously been available. This element now makes an appearance here in a new colour, light bluish grey.  Further recolours follow soon afterwards in the build, specifically light bluish grey 45 degree 1 x 2 slopes with cutout and without stud and light bluish grey left and right curved 2 x 1 slopes with no studs and stud notch, none of which to my knowledge had previously appeared in a set in his colour. The latter are combined with some light bluish grey 1 x 1 round quarter tiles to make up Han's petrified hair. Han's closed eyes, represented by exclusive printed light bluish grey 1 x 1 round tiles, are then put into place, after which all that's left to do is finish up the background carbonite block.


The sides of the carbonite block feature a number of printed 1 x 2 tiles which represent digital readouts, buttons and switches; there are two different designs of printed tile utilised, both of which are presumably exclusive to the set. Four trans-clear 1 x 2 x 1 panels attach to the back of the block (below), and when the build is laid horizontally they help to create the illusion that it's floating above the ground. Once upright the block doesn't attach to the display base via studs; instead it sits within a tiled slot bounded by black 1 x 4 x 1 and 1 x 2 x 1 panels. The base incorporates a second NYCC-printed 2 x 4 souvenir tile identical to that found on the base of the Boba Fett Brickheadz.


You can see the pair of completed builds below. The set is a delight for anyone who loves Star Wars and is a fan of the Brickheadz aesthetic. Given how cool the set is, it's a huge pity that LEGO chose to release it as a NYCC exclusive rather than as a retail set, and it's unfortunately far from being the first time that LEGO have severely restricted supply of a desirable item like this - longstanding readers of Gimme LEGO may recall my past rants on the subject, for instance this one. It's clear however that the practice of restricting desirable collectables to a lucky few on the basis of geography or just dumb luck is clearly not going away anytime soon. I guess there's always a chance that LEGO will take pity on fans and decide to release the set, or at least a variation of it, at retail at some point. Past history doesn't provide much cause for optimism in this respect, however, and in all likelihood it'll therefore be a case of having to stump up the cash on the secondary market or just going without. It's not even as if these Brickheadz can be accurately Bricklinked, given the number of exclusive printed elements that they incorporate.


Determined collectors can at least aquire a copy of the set from the likes of eBay and Bricklink if they're feeling sufficiently flush. Most copies of the set currently listed for sale are located in the U.S., meaning that unless you're based there you can expect the overall cost of acquisition to be considerably bumped up by the addition of shipping fees and import duty. At time of writing there are a number of boxed, sealed examples of the set available on Bricklink starting at £125 plus shipping, although you may be able to find one for less on eBay. Happy hunting!


Still on Track

$
0
0
One of the cool things about working for the LEGO company is that it gives presents to its employees in the form of LEGO sets. These aren't just any LEGO sets either - they're exclusive employee sets. These sets are typically given out at Christmas, and they're almost invariably well worth having. Highlights from the past few years have included 4002014 LEGO HUB Birds (below) which was given to employees as a Christmas gift back in 2014, and 4002017 Nutcracker which employees received at Christmas 2017.


While these employee sets aren't available at retail, it's nevertheless fairly easy for non-employees to get hold of them as some LEGO employees view them as an opportunity to make a quick buck and consequently sell them on eBay, Bricklink or elsewhere. They're not cheap, though - with the increase in popularity of LEGO and the rise of LEGO collecting as a hobby there's a ready market for such exclusive items, meaning that employees can get good money for them.

Of all the sets gifted to employees over the past few years, perhaps the most desirable of all from my perspective is 4002016 50 Years on Track from 2016 which is a celebration of 50 years of LEGO trains. The set contains predominantly 4-wide miniature versions of six different trains released by LEGO over the years, most of which can be considered noteworthy or iconic. As a fan and collector of LEGO trains I was predictably drawn to this set, and eventually took the plunge on a sealed copy from Bricklink which I bought for myself as a belated Christmas present!


The box leaves little to the imagination, showcasing all six miniature builds on the front (above). These images are accompanied by a black and white picture of Kjeld Kirk Kristiansen, former president and CEO of The LEGO Group, playing trains with a young girl. The same image appears on the back of the box (below), next to a picture of Kjeld's father Godtfred Kirk Christiansen playing trains with a young boy. I did wonder whether the youngsters might be family members, but the identities of the children are not stated. Given how much I paid for the set, I had to smile ruefully at a 'Not for sale' message printed in eight languages on the right side of the box....


The box opens in a similar fashion to a typical LEGO Architecture set. Cutting a couple of tape seals allows the front of the box to be lifted up, revealing Christmas greetings printed in a variety of languages on the front edge of the box. Nestled inside the box are six sealed bags of LEGO elements and six booklets containing building instructions. There's no sticker sheet.


Each individual build has its own numbered bag of elements and booklet. You can see the cover of the first booklet above; this 36-page booklet provides instructions for building a miniature version of the locomotive from 113 Motorized Train Set which was the first train that LEGO ever released back in 1966. All six booklets contain a brief introduction to the set which inspired their particular miniature build. The first booklet also contains a short introduction to the entire 50 Years On Track collection, while the sixth booklet contains an inventory of all the elements appearing in the set. All six booklets have the same back cover (below).


Construction of the miniature Motorized Train commences with the assembly of a display base. This incorporates a pair of light bley rails which have only previously appeared in four sets in this colour. The rails are mounted on dark bley 6 x 6 plates and are accompanied by an arrangement of reddish brown tiles which serve as sleepers. A display plaque consisting of a modified 4 x 4 tile with studs on one edge printed with the words 'Motorized Train Set 1966' is mounted on the edge of the display base by way of a reddish brown A-shape wedge plate with 2 rows of 4 studs and an uncommon reddish brown 2 x 2 top hinge plate.


The miniature locomotive itself is a fairly straightforward build which doesn't employ any particularly rare elements apart from small red train wheels which are exclusive to this set. Even so, it's a pretty good representation of the crudely-styled original locomotive, thanks in part to the use of a variety of modern elements such as single and double cheese slopes and jumper plates. You can see the original 1966 locomotive running in this video clip.


We jump forward 10 years for the subject of our second miniature train which is the locomotive from   726 Western Train released in 1976. According to the corresponding booklet (below) it's believed that set 726 was the inspiration for the Western locomotives that appeared in LEGOLAND shortly afterwards.


Once again the build commences with construction of a display base which is identical to that employed for the miniature Motorized Train apart from the printing on the display plaque. Similar to the previous build the train's headlights are fashioned from a pair of modified 1 x 1 headlight bricks which are laid on their backs thus making them 2- rather than 3-plates high, and again there's liberal use of jumper plates and cheese slopes which help to neatly mimic the original design at a smaller scale. The windows are formed from stacks of yellow modified 1 x 1 plates with vertical clip. This element exists in a number of different variants, and irritatingly those supplied with my copy of the set are a mixture of two different types and this is evident in the build as the clips don't line up as neatly as they should.


The sides of the boiler are fashioned from blue and black 45 degree 2 x 1 slopes with 2/3 cutout.
An uncommon yellow 1 x 2 x 2 panel with side supports makes an appearance at the front of the cab, while the back of the locomotive is made up of a red 1 x 4 x 2 panel with side supports; this element is only appearing in a set for the sixth time ever in this colour. The attention to detail is laudable - even the buffers and magnetic couplings of the original locomotive are modeled via the use of black Technic ball joints and red & blue 1 x 1 round tiles respectively. The coupling rods are also reproduced via the use of yellow 6L bars with stop ring which have only previously appeared in five sets in this colour. Overall, it's an excellent representation of 726 Western Train and a nice little display model in its own right.


AFOLs have been clamouring for the return of monorail for more than a decade now, and LEGO has steadfastly refused to bring it back, so it's perhaps ironic that the next set chosen to be immortalised in miniature form is the classic 6990 Monorail Transport System from 1987....


Consistent with the other builds the display base is first to be assembled, although uniquely in this case the base incorporates a section of elevated monorail track. The stanchions which support the single light bluish grey 16L track section upon which the monorail rests are represented by modified 1 x 2 plates with long towball.


The designers have done a cracking job of reproducing the full size monorail in miniature form, managing to nicely capture the overall shape and include most of the pertinent exterior details. Construction of the 3-wide chassis is facilitated by the use of an uncommon black 3 x 3 plate which is only appearing in a set for the tenth time in this colour and which forms a part of the floor of the monorail. Bionicle Barraki eyes are used to represent the characteristic trans-dark blue and trans-red lights on either side of the monorail. The full-sized monorail's 9V motor and connecting cable are particularly impressively reproduced, utilising a white robot body and a black flexible whip, while a pair of white hockey sticks, which were only previously available in eight sets in this colour, cleverly mimic the flexible hose which forms a loop at the front of the original model. There's also ingenious use of pairs of flat silver ice skates which attach to the underside of the body and are perfectly spaced to ensure that the monorail fits snugly on the single rail beneath and can smoothly slide backwards and forwards.


The classics just keep on coming with the much-loved 4558 Metroliner from 1991 next up for miniaturisation. Such was its popularity that the Metroliner was re-released in 2001 with a new set number (10001).


For the miniature Metroliner build we're back to using the same style of ground-level display base that was previously used for the Motorized Train Set and Western Train.


This is another great-looking miniature build which is once again pleasingly faithful to the original design. The distinctive red, white and blue stripes along the sides of the locomotive appropriately survive the miniaturisation process, as do various other prominent external landmarks. The front of the locomotive is fashioned from a variety of 45 degree slopes including black 2 x 1 45 degree slopes with 2/3 cutout and a trans-black 3 x 4 x 1 1/3 windscreen with 2 studs on top; all that's missing is a slope printed with the LEGO train logo from the 1990's. The attention to detail extends to the construction of twin bogies, each of which attaches to the underside of the train via a modified 2 x 2 tile with pin. This allows the bogies to rotate, which is impressive but ultimately unnecessary given that the train will never have to navigate a section of curved track. Black minifig handlebars representing a pantograph attach to the roof and complete the build.


We now come to the build that I was most looking forward to, the miniature version of 10194 Emerald Night which is one of my all-time favourite sets. Released in 2009, Emerald Night set a new standard for LEGO trains, and the high aftermarket prices are testament to its enduring popularity - it's an absolutely beauty!


Once again the same ground-level display base is utilized, and as a consequence there's only space to reproduce and display the locomotive itself - a miniature version of the tender is unfortunately not included in the build. That having been said, I don't think it would be particularly difficult to increase the length of the display base and design your own tender should you feel so inclined.


I'm pleased to report that the miniature Emerald Night doesn't disappoint - it's an excellent little build. Pretty much all of the key exterior detailing is reproduced apart from the connecting and coupling rods over the drive wheels. The front of the locomotive is cleverly sculpted by way of a black 4 x 3 wedge open with cutout and 4 studs, while the sides of the boiler are shaped via the use of 3 x 1 and 2 x 2 dark green curved slopes. Stickers featuring the set number in gold print are attached to the sides of the driver's cab in the original set; this detail is crudely reproduced here via the use of pearl gold 1 x 1 plates. The miniature build utilises six spoked train wheels with Technic axle hole and rubber friction band; fitting these is tricky as they need to be squeezed beneath tight overhangs, and in addition the 4L axles that attach them to the chassis are a very tight fit. The original Emerald Night features a total of six smaller front and trailing wheels in addition to its six large driving wheels, and these are also faithfully reproduced in the miniature version via more of the black small train wheels seen previously in the Metroliner miniature build.


The final build is a miniature version of 10254 Winter Holiday Train which was released in late 2016. This is in some ways a slightly surprising choice for inclusion in this collection given that it's such a recent offering and arguably not in the 'classic' bracket. Even so, it certainly brings the collection bang up to date.


After building the now-familiar ground-level display base for the fifth and final time, attention quickly shifts to the locomotive. Two sand green modified 1 x 1 bricks with studs on opposite sides, which are only appearing in a set for the second time, form part of the internal structure of the boiler, while the exterior of the boiler is shaped via the use of green 1 x 2 and 2 x 2 curved slopes with no studs. The roof of the driver's cab is made up of more green curved slopes, and a pearl gold modified 1 x 2 with handle on side - closed ends provides some decoration at the front of the cab.


The main drive wheels consist of a pair of red spoked train wheels with Technic axle hole and rubber friction band which are only appearing in a set for the second time in this colour, while four of the exclusive red small train wheels mimic the original's front wheels. The original Winter Holiday Train build featured a cow catcher at the front, and a black modified 1 x 2 plate with angled handles on the side does a good job of representing this in the miniature build.


With the miniature Winter Village Train build finished the full 50 Years on Track collection is complete and can be seen laid out below.


As a longstanding fan of LEGO trains I found this set to be an absolute joy to build. All six miniature models are superb representations of the full-size originals, and the attention to detail lavished on each of the builds is commendable. The set isn't quite perfect - given the choice I would probably have dropped the miniature Western Train and Winter Village Train and replaced them with miniature versions of any two of 396 Thatcher Perkins Locomotive7740 Inter-City Passenger Train Set6399 Airport Shuttle, or even 10233 Horizon Express. Minor gripes aside, however, the selection is undoubtedly varied and interesting, and I suspect that any longstanding fan of LEGO trains is pretty much guaranteed to find at least one of their favourites among them.


Similar to 41498 Boba Fett and Han Solo in Carbonite which I reviewed a few weeks back, it's a real shame that 4002016 50 years on Track was never available at retail and is thus destined to remain out of reach for many LEGO fans. If you want to acquire a copy of the set you'll need to venture on to the likes of Bricklink, which is what I did, or eBay; at time of writing, Bricklink prices start at around £125/$175 plus shipping for a new, sealed copy of the set. Not cheap, but I have no regrets - outstanding!

Mined Out

$
0
0
One of the great things about the LEGO hobby is the sheer number and variety of niches to be found within it. Although I entered the fray as a big LEGO Star Wars fan, my areas of interest have expanded since then to encompass Modular Buildings, constructing my own MOCs, collecting various other LEGO themes and even dabbling with the odd bit of Technic.

One niche that I haven't previously dipped my toe into, however, is Great Ball Contraptions, or GBCs. GBCs are machines built from LEGO and usually powered by LEGO motors which transport small balls from one place to another. Multiple GBCs are typically chained together, with balls being passed from one GBC module to another, sometimes over considerable distances. In order to facilitate collaboration between GBC builders so that their modules are compatible with each other, a GBC standard has been defined. This standard legislates for various factors such as the size and location of a module's 'in-basket' and the rate of ball flow into the machine, amongst others.


I'd been largely oblivious to the GBC scene until recently when a GBC discussion thread on the Brickset Forum caught my eye. Particularly interesting were postings which linked to a selection of spectacular GBC modules such as the Strain Wave Gearing GBC Module (above) built by akiyuky who was also responsible for the incredible collection of GBC modules that you can see here. I was so impressed that I decided I wanted to have a go at building a GBC myself, but where to start? I've built a few Technic sets, for instance this one, but have never built a Technic MOC. Also, pretty much all of my Technic elements are tied up in official sets, so I initially wasn't sure how best to proceed.

Thankfully the community came to my rescue in the form of a posting by Brickset Forum member greatballpit who linked to this video that he'd posted on YouTube. The video showcases a fully functional GBC module that can be constructed in its entirety using the elements contained in just one recent Technic set, 42049 Mine Loader. I initially assumed that I'd need to reverse-engineer the build by studying the video clip, but it later transpired that instructions are available to download for €8.95 so I decided to take the plunge, pay the money and make my life a whole lot easier. In addition to getting me started in the world of GBCs, the project would also give me the perfect excuse to review the mine loader set, an official LEGO offering that I hadn't previously paid much attention to.


The front of the box (above) showcases the finished mine loader model which is a decidedly odd-looking vehicle - I did a quick internet search and couldn't actually find its exact real-world equivalent, although Caterpillar do manufacture a variety of underground mine loaders which appear broadly similar apart from the attachment at the front. Technic sets characteristically feature an alternate build which can be constructed with the elements contained within the set. In the case of 42049 the 'B' model is a rock cutting vehicle and this is shown on the back of the box (below).


The box opens via a couple thumb tabs on the left side, although as usual I ignored these and instead carefully slid a knife under the seams and opened the left side, thus minimising damage to the box. The box contains four unnumbered bags of elements, three instruction booklets and a sticker sheet (below). There are also four huge rubber tyres loose in the box.


The mine loader is the larger of the two builds and has two instruction booklets as against one for the rock cutter. Both mine loader booklets have front covers which are identical apart from the booklet number in the bottom right corner.


I seldom build Technic. It's therefore not surprising that when I do I should encounter elements that I haven't seen before. This time it was red 6L and yellow 7L axles that caught my eye, although it turns out that these have been around for years and have appeared in multiple sets. Genuinely uncommon elements appearing in the set include a yellow Technic 3 x 3 T-shaped thick liftarm which is only appearing in a set for the tenth time in this colour, and a light bluish grey large Technic turntable base plus its black large Technic turntable top counterpart, both of which have only appeared in a total of 10 sets to date.

In terms of notable features, the build incorporates a 2-cylinder engine; it's actually not the first time that I've built a LEGO Technic engine but I still find it impressive the way that the LEGO crankshaft smoothly drives the pistons in the engine block. The crankshaft also attaches to a flat silver 8 blade propeller which represents a cooling fan and which has only previously appeared in seven sets in this colour. By the end of the first instruction booklet we're well beyond the halfway point in the build (below).


With the bulk of the internal structure and Technic mechanisms already completed, much of the remaining build consists of predominantly cosmetic details. The mudguards behind the front wheels consist of yellow Technic curved 3 x 6 x 3 panels which are only appearing in a set for the third time. These are decorated with black and yellow striped warning stickers and provide the attachment point for bilateral twin headlights. The driver's cab bolts on to the left side of the vehicle and includes a single seat which is made up of a couple of blue 2 x 4 L-shaped thick Technic liftarms. A single exhaust represented by a light bluish grey vehicle exhaust pipe with Technic pin emerges from the left side of the engine, and a couple more of the yellow Technic curved 3 x 6 x 3 panels are used to create the corners of the rear bumper which also incorporates a pair of trans-red tail lights.

The build is nearly complete now. An aerial, represented by a flat silver rapier, attaches just in front of the engine, after which the four wheels with their huge 62.4mm tyres are attached. Finally a red drum, made up of a pair of stickered interlocking red 3 x 5 x 8 cylinder halves which are exclusive to the set in this colour, is assembled and we're finished (below).


I asked my ten year old what he thought of the finished build and I have to report that he wasn't particularly impressed with the look of it; I'd have to agree that it's rather underwhelming from an aesthetic point of view. The build does however incorporate a number of functions, and all of the mechanisms work well.


The large Technic turntable I mentioned earlier connects the front and rear sections of the vehicle. Turning the small black gear next to the cab rotates the turntable; this pivots the entire front section and thus steers the vehicle as you can see in the picture below. Meanwhile, pushing the vehicle forwards or backwards causes the pistons in the engine block to smoothly rise and fall, and the cooling fan at the back to rotate. At the front of the vehicle the claw can be raised and lowered; it's in the fully raised position in the picture above, and the lowered position below. The claw can also be closed and opened so as to grab and subsequently drop the red drum; this is accomplished by rotating another small black gear which is located just in front of the engine. The gear connects to the claw via a long axle assembly running almost the whole length of the vehicle.


With the mine loader completed and photographed it was time to take it apart in preparation for building the 'B' model. One of the reasons that I've struggled to love Technic over the years is the misery of deconstructing the builds, which is both time consuming and a cause of physical discomfort. Thankfully the mine loader is modestly sized so taking it apart didn't take too long, although as ever it was not a comfortable experience for my fingers.


The 'B' model, a rock cutter, is another curious-looking vehicle and a quick online search didn't reveal any real-world examples of machines that looked remotely similar. Like the mine loader it incorporates a 2-cylinder engine, with the pair of red cylinder halves which were previously used to fashion the drum being repurposed as engine covers that wrap around either side of the engine block. The turntable assembly, previously utilised as a steering mechanism for the mine loader, is incorporated into the boom of the rock cutter.


Attaching the boom doubles the length of the vehicle and makes it predictably unwieldy. Despite this, the weight of the body ensures that the centre of gravity is far enough back for the vehicle to be nice and stable, although like the mine loader it's a decidedly strange-looking beast. Following completion of the rock cutter there are 57 elements left over, of which 11 are spares. The rock cutter therefore utilises more than 90% of the set's total of 476 elements.


Function-wise I found the rock cutter to be more interesting than the mine loader. The vehicle can be steered by rotating the prominent tan gear in front of the engine which turns the front wheels, and similar to the mine loader the pistons in the engine block smoothly rise and fall when the rear wheels rotate. The boom can be raised and lowered by turning a crank on the right side of the vehicle, and unlike the claw at the front of the mine loader it has a substantial range of vertical movement. As you can see in the picture below the orientation of the blade can be changed; a pair of red bushes are attached to an axle just above the turntable, and turning these bushes rotates the turntable which changes the angle of the front section of the boom and hence the blade. Finally, you can spin the blade itself by rotating the tan gear at the base of the boom.


So that's both the 'A' and 'B' models built, then. Overall, while neither of these strange-looking vehicles will ever win a beauty contest, they were both enjoyable to assemble. Furthermore, they both manage to cram in a fair number of functions, all of which operate smoothly and reliably.

42049 Mine Loader was released in 2016 at a price of £29.99 / US$49.99 / 39.99€. You may struggle to find this set at retail now, but at time of writing new sealed examples can still be acquired at or below the RRP over at Bricklink which is where I bought my copy from.


Right, now to disassemble the rock cutter in preparation for my first attempt at building a Great Ball Contraption. Check back in a couple of weeks to find out how I got on....

Great Balls of Fire

$
0
0
OK, so when I last wrote I was preparing to take my first, faltering steps into the world of Great Ball Contraptions, or GBCs. I'd found instructions online to a GBC which could be constructed using only the elements contained in a single Technic set, 42049 Mine Loader, and prior to cannabalising the parts I'd built and reviewed both the Mine Loader and the alternate build, a Rock Cutter.


My next job was to disassemble the Rock Cutter, after which it was time to get to work on my first GBC. I had initially planned to reverse engineer the GBC, which was designed by Great Ball Pit, from a video clip but I ended up paying to download a set of instructions instead which, as it turned out, made my life a whole lot easier. The download, which is in .pdf format, consists of a total of 62 pages and you can see a full listing of the content in the screengrab below. As well as a 54-page building guide the document also incorporates other content including hints for fine-tuning the GBC mechanisms and instructions for upgrading the module with Power Functions. The building guide is fairly easy to follow; at each stage the parts you need to add are highlighted in pink, and the build is logically sequenced.


I was about a third of the way through the build when I took the photograph below. The GBC module has been designed to be mounted onto a trailer, and the trailer chassis is pretty much done by this point. A pair of wheels will later be attached to the axle that you can see in the foreground, while the various gears embedded into the chassis are part of the mechanism that makes a single cylinder move up and down in the chassis-mounted engine block when the GBC module is activated. The stickers that you can see here and in subsequent pictures are a reminder that we're using recycled elements from a donor 42049 Mine Loader set, and they don't have any significance with respect to the GBC module.


With the chassis complete it's time to get to work on the section of the GBC which is responsible for moving the balls (below). The mechanism consists of a series of sweeper arms which pass the balls along the line as they rotate. The arms obviously need to work together in perfect harmony to make this happen, and in order for the arms move in unison they're connected underneath via a system of gears. Timing is critical - one sweeper arm can't pass the ball to the next unless the rotation of the arms is carefully coordinated - and for this reason specific instructions are provided to ensure that the sweeper arms are correctly positioned relative to each other.


Another important part of the module can be seen on the left side of the picture above. A black 1 x 6 Technic link connects the spindle of the first sweeper arm to a pivoting structure; as the spindle turns it rocks the structure backwards and forwards, which has the effect of feeding balls from the "in-basket" to the first sweeper arm in the finished module.


You can see how everything fits together in the pictures above and below which show the completed GBC module from the front and the back. The GBC mechanism is activated by turning a crank which is located to the left of the wheel in the picture above. Once the balls are swept to the top of the slope by the arms they're 'recycled' along a rear return channel and roll back down into the in-basket, thus creating a perpetual loop. The light bluish grey exhaust pipe element at the top of the slope diverts the balls down the return channel, but if you want the balls to be transferred to an adjacent GBC module instead then the exhaust pipe can be removed and the balls will then drop off the end of the conveyor and into the in-basket of the next module.


You can motorise the module quickly and easily by replacing the hand crank with a LEGO Power Functions motor. I used a standard XL Motor powered by a Battery Box containing six rechargeable eneloop AA batteries and you can see the result in the video clip below; if you're having difficulty viewing the embedded video clip then you can watch it here instead.


Occasionally the ball at the front of the queue needs a nudge from one of the returning balls in order to launch it onto the conveyer, but otherwise the mechanism runs smoothly and the balls are quickly and efficiently whisked up the slope. Watching the module operate is actually quite hypnotic, and it's certainly given me a taste for more. There's still the issue that I don't have many loose Technic elements, but having now built a GBC with the aid of instructions I at least have a better idea of what I'll need in order to build one of my own design and I've also picked up a few techniques that I can potentially make use of so overall it was a valuable learning experience.

If you'd like to build this GBC then you can purchase instructions from here for €9.95. I don't have any financial interest in the sale of these instructions, incidentally, and I paid for my own copy.

Hen's Teeth

$
0
0
Lapsed LEGO fans can emerge from their Dark Ages and re-enter the hobby via any number of different routes, but one of the most common motivations seems to be a desire to rediscover the beloved sets of their youth. That was certainly a major factor for me; while the initial trigger was the arrival of 10188 Death Star as a Christmas present, the next stage was a protracted trawl through my childhood LEGO collection and the painstaking restoration of my childhood sets. The desire to replace missing parts lead to the discovery of Bricklink, while building instructions were secured from the likes of Brickset and Peeron; the realisation that boxed examples of my childhood favourites could be secured, at a price, from the likes of eBay and Bricklink lead to ever more expensive competition with fellow AFOLs, and thus was my descent into obsessive LEGO fandom confirmed....


I think the first set that I scraped together from my childhood collection and then subsequently purchased a boxed example of was probably 928 Galaxy Explorer (above). Over time I gradually tracked down boxed examples of other childhood Classic Space favourites via eBay and Bricklink, after which I started to home in on sets that I'd never owned as a child in order to try and expand my collection. A number of Classic Space sets have remained stubbornly elusive over the years, however, with reasonably priced boxed examples being hard to come by, but I did recently manage to track down one of them, 924 Space Cruiser, so I thought I'd share it with you here.


According to Brickset the name of the set is Space Transporter, while Bricklink calls it Space Cruiser. I'd normally side with Brickset, out of loyalty to my favourite LEGO site if nothing else, but in this case I consulted the excellent LEGO Collector's Guide, Second Edition which calls it Space Cruiser so I went with that. The front of the box (above) consists of a flap which lifts up to reveal the set contents. The flap is printed with a slightly over-exposed image of the LL 924 Space Cruiser spacecraft in flight over the surface of a barren planetoid. A blurry forklift, the set's small ancilliary build, is pictured in the background along with one of the set's two minifigures. Unfortunately, my copy of the set features the unwelcome 'bonus' of an unsightly mark caused by ancient adhesive tape running across the front of the box; normally such an addition would discourage me from parting with my cash, but when boxed examples of a set are in such short supply you sometimes just have to bite the bullet. The back of the box (below) showcases a number of alternative builds which can be assembled from the set contents.


The A4-sized instruction booklet arrived folded in half in order to fit into the box but has been unfolded here so I could photograph it. The front cover (below) features an upper panel which reproduces the artwork from the front of the box, while the lower panel contains assembly instructions for the set's two minifigures together with a small cargo container.


The back of the instruction booklet (below) showcases a number of Classic Space sets from 1978 and 1979, a sight sure to bring joy to the hearts of nostalgic AFOLs worldwide!


The box also contains a folded promotional leaflet which advertises offerings from a myriad of different LEGO themes from Duplo to Castle, Technic and beyond. You can see the panels promoting a selection of Classic Space sets below, and I've also scanned a few of the other panels which you can see on the Gimme LEGO Flickr stream here.


As mentioned above the set contains two minifigures. I've waxed lyrical about these guys in previous reviews, for instance here and here, but I make no apology for reiterating how much affection I still have for them almost 40 years after my first encounter. The iconic Classic Space torso print, which has launched a thousand t-shirts, has predictably faded somewhat on the red figure but looks surprisingly fresh and sharp on the white figure even if the torso has yellowed a little over the years.


Most notable from the rear are the air tanks, the design of which is the same now as it was back in 1979. There's no backprinting on the torsos or the classic smiley heads.


With the minifigures assembled it's time to start on the build proper. First to be constructed is a small cargo container. This consists of white left and right 1 x 3 x 1 doorsand little else, although at least the doors can be opened to provide access to the cargo, a trans-green 1 x 1 round brick. A simple forklift is provided to move the cargo around; while only consisting of seven elements, the vehicle features an impressive light grey spring-loaded fork assembly at the front which only ever appeared in this set, its U.S. doppelganger (487) and a rare Service Pack which I wasn't even aware existed until I wrote this article.


The ship itself is built on a light grey 16 x 6 plate, upon which various other light grey plates are progressively stacked in order to form the distinctive Classic Space silhouette. As in the likes of 918 and 928 light grey left and right 8 x 4 wedge plates play a key role in defining the outline of the ship, while even early on in the build further nods to other Classic Space offerings are provided by way of the yellow and black detailing on the wings and the trans-green and trans-red 1 x 1 plates. The ship is supported underneath by four 2 x 2 x 2 stands, and a couple of 2 x 2 round bricks are also attached to the underside, presumably representing vertical thrusters.


I'm not sure there's such a thing as a 'beloved LEGO element' but if there was then the blue 33 degree 3 x 6 slope printed with the Classic Space Logo at the front of the ship would surely qualify. Both sides of the fuselage incorporate a blue 1 x 4 brick printed with the ship's 'LL 924' identifier; these printed elements are predictably unique to this set and its U.S. equivalent. The cockpit contains a couple of light grey 45 degree printed 2 x 2 slopes (this one and this one) which make up an instrument panel, and there's more than enough room for both minifigures despite the presence of a steering wheel. The cockpit is enclosed by a number of delicious trans-yellow elements including a pair of uncommon 33 degree 3 x 6 slopes which form the windscreen, 1 x 2 and 1 x 4 bricks, and a rare 4 x 10 plate. The fuselage walls also incorporate a pair of blue 1 x 2 bricks printed with the Classic Space logo.


From behind the view is dominated by a pair of light grey 4 x 4 x 2 cones which serve as the main engines. These have only ever appeared in a total of seven sets in this colour. They're mounted on the back of the brick-built cargo bay doors which swing open on swivel hinge bricks to reveal a compact cargo bay. The cargo bay doors incorporate a pair of blue 1 x 2 bricks printed with a down arrow. The blue 1 x 2 tile on top of the tail prevents the cargo doors from swinging open unintentionally.


The completed LL 924 build together with the forklift, cargo and minifigures can be seen in the picture below. The cockpit roof is attached via a pair of hinges which enable it to be tilted, thus providing cockpit access. The cargo bay can just about accommodate the cargo, but is nowhere near big enough for the forklift to fit into.


Having now built LL 924 and had the opportunity to compare it with its baby brother (918) and big brother (928) I reckon that in terms of its overall proportions it arguably looks the best of the bunch. For all its obvious splendour and deserved iconic status, LL 928 is maybe just a fraction too big and bulky to be considered sleek, while LL 918 is a bit of an ugly duckling. I think LL 924 hits the sweet spot in terms of size, however, and aside from the awkward transition from the light grey wedge plates to the modified 1 x 2 plate with handles at the front of the ship, and the row of exposed, open studs on top of the 4 x 2 x 2 tails on either side, I reckon it looks damn-near perfect.


Given the obvious merits of LL 924, it's interesting that boxed examples of the set seem to be so much harder to come by compared with 918 or 928, the implication being that the set didn't sell well. Maybe that's because it lacks the grandeur and playability of 928, with its landing pad, crater baseplate, moon base and moon buggy which fits inside the cargo hold, while simultaneously lacking the affordability of 918. Regardless of the reason, it's still well worth picking up if you can find it at a reasonable price.


Set 924 Space Cruiser was released in 1979 and contains 170 pieces. I purchased my copy from eBay for around £90, having waited a long time for an affordable boxed example to be listed there. If however you're not willing to wait, various sellers have the set listed for sale on Bricklink, with prices for a boxed example starting at £125 plus shipping. At time of writing there are only three complete boxed copies available, however, so be quick!

Modular Row

$
0
0
Remarkably, in November of this year it'll be fully eight years since I booted up LDD and started to design my own LEGO City. To say that progress has been slow would be an understatement of epic proportions - you could probably have built a real city in the time that it's taken me to build mine so far.... My last update, which described the partial construction and installation of a 10224 Town Hall-inspired railway station MOC (below), was posted a year and a half ago, and since then the project has ground to a halt for the umpteenth time as my LEGO room has once again had to serve as a storage room during a protracted period of real-life building work.


Even though my LEGO room has yet to return to normality, an opportunity to work on the project, albeit in a roundabout way, has nevertheless presented itself. As previously described on these pages (for instance here and here), there's an annual event hosted by the Museum of the Great Western Railway in Swindon which showcases LEGO creations built by members of UK LEGO User Group The Brickish Association. As a Brickish member I'm eligible to exhibit my builds at the show, affectionately known as STEAM. This year one of the displays will be a collaborative display of more than thirty modular buildings designed and built by Brickish members. Anyway, I figured that if I signed up my railway station for the collaborative build then I'd have extra incentive to get off my backside and finish it off. It seemed like an excellent idea at the time, so I went ahead and signed up as a participant, figuring that it shouldn't take too much work to make my build display-ready. In hindsight, however, perhaps I should have taken a closer look at the back of my work-in-progress MOC (below) before being quite so dismissive about the amount of work involved....


With no clear idea of how to complete the build I powered up LDD, dug out the LDD file for the build thus far, and had a play with it. Ultimately I'm planning to replace the back of the building with a full length station platform complete with a canopy which will overhang the platform and railway track. With STEAM fast approaching, however, and with elements to source and little time to play with I decided to keep things simple for the upcoming display and follow the design used for the back of 10224 Town Hall, extending it for the full width of the expanded building. The side walls, meanwhile, would take inspiration from the front of the station which I'd already completed. Having settled on a plan of action I went ahead and completed two-thirds of the building in LDD, both to reassure myself that I'd be happy with the overall look, and also to help me estimate what additional elements I'd need; you can see an LDD screen grab of part of the back of the building below.


With the design now sketched out in LDD I was ready to crack on with the actual build. In order to integrate the railway station into my City layout I'd had to mount it on an idiosyncratic arrangement of small baseplates, so my first job was to strip these away and replace them with standard 32 x 32 baseplates. When it came to the rest of the building I thankfully already had most of the basic bricks and plates required to construct the outer shell, but I was predictably lacking when it came to the huge number of windows that I'd need, not to mention the larger white plates for the individual floors and various other bits and pieces. I therefore built as much as I could before diving into Bricklink to order the elements that I didn't have. All told I ended up having to order almost 450 elements to complete the build, but at least I was able to find a single EU-based seller who had everything I needed (thanks, Kepes!)

My Bricklink order duly arrived a few days ago which leaves me with the best part of 2 weeks to finish my railway station. I'll post pictures of the build on Gimme LEGO after the event, so stay tuned. Or better still why not come to STEAM a.k.a. the Great Western Brick Show and see it for yourself?!

Letting Off STEAM

$
0
0
It feels like a lifetime since I last posted (here). On that occasion I was preparing to finish up my railway station MOC in preparation for its appearance as part of a display of modular buildings at the Great Western Brick Show a.k.a. STEAM in Swindon. I'm pleased to report that all the elements that I ordered from Bricklink to complete the build duly arrived as promised, and the MOC (below) was completed in good time for its public unveiling.


In addition to completing the sides and rear of the station, a couple of modifications were necessary in order to accommodate the transition from my LEGO city layout to the STEAM display. Firstly, I needed to mount the build on baseplates and tile around the edges. Then I needed to figure out what to do about the area under the two arches at the front of the building. In my city layout each of these arches encloses a stairway which descends to a subway platform on the lower level, but this wasn't an option for the STEAM display which is on a single level. In the end I blocked off each arch with a door, using reddish-brown tiles to mimic a wood effect as you can see in the picture below.


The rear of the building (below) follows the LDD design that I shared in my previous post. It's something of a temporary solution - while in place in my city layout the station has track running behind it, and the plan is ultimately to build a station platform at the rear of the building together with a canopy over the platform. Also, if I hadn't been in such a rush to complete the build for STEAM then I'd have embedded a few more skylights into the roof; unfortunately this'll have to wait until I have more time.


The left and right sides of the building take their design cues from the front, with almost identical designs employed for the various windows, sills and decorative lintels (below).


With the build complete it was time to pack up the station in preparation for the drive down to Swindon. I was planning to separate the building's four floors and pack them into a pair of large rectangular crates, but it turned out that the crates were too small to accommodate the ground floor so I ended up wrapping that section in an old bed sheet and carefully wedging it in the boot of my car. Thankfully all sections survived the journey and arrived at the venue relatively unscathed on the Saturday morning. Many of the exhibitors had already arrived and set up the day before, so I had the simple task of locating the station-sized plot in the almost-complete modular display and re-assembling my build in the allotted space.


You can see the station in position above (thanks to Jamie Douglas for the picture). As well as mobilising Brickish members such as myself to contribute a variety of modular buildings, display organiser Simon Kennedy did an impressive job of recruiting members to construct sections of brick-built road and pavement, vehicles, trees and various roadside structures which really brought the display to life. The lime green Porsche 911 that you can see in front of the station in the picture above was taken from set 75888 Porsche 911 RSR and 911 Turbo 3.0 and is the very car that I built for my Brickset review of the set. More pictures of the completed modular display, together with images of other LEGO creations that were shown at STEAM, can be found here on Jamie's Flickr stream.


Embarrassingly, it's taken me so long to write and publish this post that the 2018 event has long passed and the 2019 Great Western Brick Show is now fast approaching.... I'm pleased to report that thanks to the positive reaction to the 2018 modular display there will be an improved and expanded modular display on show at the 2019 event. This will feature a number of new modulars together with modified versions of some of the existing buildings, and there are also plans to add a canal, a railway and working street lighting. As a result of the inclusion of a railway I've been asked to modify my station to include a platform at the rear. As it passes behind the station the track will be elevated, so my next challenge is to figure out how best to attach a platform halfway up the rear of the building and somehow integrate it into the overall structure. STEAM 2019 will take place on the 5th and 6th of October so I'd better get on with it....

End of the Road?

$
0
0
As I've previously mentioned on these pages, I have LEGO Star Wars to thank for rescuing me from my LEGO Dark Ages. Specifically, it was the arrival of 10188 Death Star in 2008 which started my slide down the slippery slope. My wife bought me the set as a Christmas present, and I bet she's regretted that decision ever since....


Following the arrival of 10188 and its construction over the Christmas holidays I was basically hooked. With my passion for both LEGO and Star Wars rekindled I became gripped by a mania of sorts and decided to try and get hold of complete, boxed examples of all of the LEGO Star Wars sets going back to the first appearance of the theme in 1999.


Most of the sets were reasonably easy to find on eBay back then if you were patient, and the majority weren't particularly expensive either. A few, such as 10123 Cloud City with its exclusive Boba Fett minifigure (above) turned out to be harder to track down than most and/or painfully expensive, but they were thankfully in the minority. As chronicled in this old post I also had to make some tricky decisions about exactly what to collect, for instance whether to restrict my growing collection to retail sets alone or whether to also pursue rare promotional items such as the 2012 New York Comic Con model of Luke's Landspeeder below. I eventually opted to focus on collecting the retail sets. Promo sets would be welcomed with open arms when the opportunity arose, but they'd be considered "nice to have" additions rather than a part of the core collection.


As it turned out, however, securing a copy of every retail set to date was only the start of the story. Because while I was picking up old retired Star Wars sets, LEGO was hard at work releasing an ever-increasing number of new sets every year, and after you've invested the time, effort and expense of tracking down the full back catalogue, you feel almost obliged to pick up all the new sets too in order to stay up to date. LEGO released 13 Star Wars sets back in 1999 when the theme first appeared, and 19 sets were released the year I started my collection, so staying up to date wasn't as financially prohibitive back then. The problem is that since then the number of releases has continued to increase to a point where there were 69 LEGO Star Wars releases in 2018. Not all of those were retail sets, granted, but if I'd known how the release schedule would explode over time I might have thought twice about starting to collect the theme back in 2008....


Looking back, even prior to the announcement of the LEGO Star Wars licence extension in February 2012 my enthusiasm was starting to wane, as I confessed in this posting in 2011. Central to my disaffection was the sheer number of remakes of previously-released sets. Many of these remakes, such as 7877 Naboo Starfighter above, were arguably not even a meaningful improvement on previous versions, unless of course you consider an increase in price to be an upgrade. A growing focus on minifigures in Star Wars sets was also becoming a frustration; my love of LEGO is principally founded on the building experience rather than which minifigures a set contains, and it was starting to feel like the build was being included as an afterthought in some sets (for example 7879 Hoth Echo Base below) with the minifigures being the main driver for the release.


And yet despite my misgivings I've continued to dutifully pick up all of the LEGO Star Wars retail offerings year after year up to and including 2018, and I've also made a start on the 2019 sets. The thing is, however, it's felt like a particular slog this year, with relatively few sets really getting me excited. And so it is that with no end in sight to the annual tidal wave of Star Wars sets I've finally made the decision to stop collecting them. It stops right now, so no 75235 X-wing Starfighter Trench Run (below) for me....


Obviously this decision has been a long time coming. While there hasn't been anything in particular that has finally forced my hand, my previous complaints about the number of remakes and preponderance of minifigure-focused sets are as relevant as ever this year. To that you can add my lack of enthusiasm for the increased number of sets aimed at younger children, particularly the 4+ and Microfighters offerings, and the prevalence of sets such as 75235 above and 75237 TIE Fighter Attack below which feature crude, basic builds. All things considered, there seem to be fewer and fewer Star Wars sets of interest to me this year, so it's time to see sense and call a halt to this expensive and space-occupying obsession.


Before anybody points out the obvious, namely that I'm no longer the target audience for LEGO Star Wars, let me be clear that I'm not criticising LEGO for their continuation of the theme. While I have concerns about the way that the company does things sometimes, for instance lining the pockets of scalpers by releasing hard-to-find promo items as discussed here and here, Star Wars continues to be an extremely popular and successful product line for the company, so you can hardly blame them for continuing to pump out sets year after year. After all, youngsters are discovering the Star Wars universe for the first time every day, and the remakes of classic vehicles are serving their needs. Furthermore, LEGO can hardly be faulted for the disappointing and uninspired vehicle designs which populate the newer Star Wars movies and series'.


While my unhealthy need to collect all the Star Wars sets is now hopefully over, I do still anticipate picking up some of the Star Wars offerings. There's a good chance that I'll continue to acquire the UCS sets, for instance - the soon-to-be-released Imperial Star Destroyer above will surely be impossible to resist - and any sets featuring genuinely interesting new vehicles from the Star Wars universe (assuming we actually get some) will also be fair game. I might even be tempted by the occasional remake, providing that it genuinely offers something over and above previous iterations other than just a higher purchase price. What I won't be doing, however, is just buying Star Wars sets to keep my collection 100% up to date, and that thought fills me with relief. I really should have made this decision years ago.

Taxi!

$
0
0
Given everything that's going on in the world right now, I've felt in desperate need of some light relief to lift the spirits. One thing that works for me is to take solace in an old LEGO set and wallow in some much-needed nostalgia. My latest trip down memory lane was 368 Taxi Garage, released in 1976. I spotted my copy of the set perched atop of a bunch of other sets on a bookcase and I thought it would fit the bill nicely.


The front of the box is dominated by a simple image of the set contents assembled and ready to be played with, together with a 6+ age recommendation. The back of the box features a number of panels containing images of alternate builds including a small taxi stand, a vintage taxi and two quite respectable reimagined versions of the taxi garage. The alternate builds don't stop there, either - there's also a horse-drawn taxi carriage on one of the side panels of the box.


To open the box you just slide off the outer sleeve. This reveals a white inner tray containing the parts and an instruction sheet.


The building instructions are printed on a large double-sided sheet more than half a metre long and 27 cm wide. This folds down into a square measuring around 13.5 cm x 13.5 cm, and once folded the image above appears on the front 'cover', while the back 'cover' (below) showcases a selection of the alternate builds which adorn the box.


The set includes a pair of what LEGO have termed "stage extra" figures (below) which are I assume supposed to be a taxi driver and his female passenger. Figures like these were the precursors of modern minifigures and started to appear in sets in 1975. Unlike their modern counterparts they don't have moveable arms and legs, and there isn't any printing on their heads or torsos, although they did occasionally feature stickered torsos as you can see here. They were superseded by modern minifigures in 1978 so weren't produced for long, but they remain an interesting and important evolutionary step in the development of the minifigure. While the individual elements making up these particular figures could be found in numerous sets, this is the only set which included the taxi driver figure, while the female passenger only ever appeared in two sets in addition to this one.


According to Brickset 368 Taxi Garage contains 156 elements, although Bricklink reckons the part count is 144 plus an additional 8 elements for the figures. The garage itself is constructed on a green 16 x 32 baseplate with rounded corners which only ever appeared in two sets including this one. The set also includes a number of printed elements. The 1 x 4 yellow brick with black 'TAXI' print is unique to this set, as are a pair of black 2 x 3 bricks with white sans-serif 'TAXI' print; of note, a black 2 x 3 brick with white serif 'TAXI' print was produced in 1971 and can also only be found in one set, 605 Taxi. Other notable printed elements include a black 1 x 4 brick embossed with a chrome car grille print and a white 1 x 2 brick printed with the Shell logo.


I built the taxi first. In most respects it's identical to the vehicle in the 605 Taxi set but there are a couple of differences. Firstly, as mentioned above a different font is used for the 'TAXI' print on the side. More notably, however, the rear end has been redesigned; the older standalone taxi is just two studs long behind the rear wheels, but the newer taxi has been inexplicably lengthened by a stud and the rear looks dreadful. A yellow 1 x 2 tile is wedged between studs on the roof of the vehicle, indicating that the taxi is available for hire; this building technique wasn't uncommon back in the day but was later deemed "illegal" by LEGO as it places undue stress on the elements concerned.


By 1976 LEGO had stopped printing a dot pattern on baseplates (like you can see here, for instance) to guide placement of elements so the 16 x 32 baseplate supplied with this set is consequently unprinted. Construction of the taxi garage is predictably quick and straightforward, requiring only 12 steps on the instruction leaflet. As previously stated the yellow 1 x 4 brick with 'TAXI' print on the garage roof is exclusive to this set, while the pair of 1 x 4 x 6 yellow doors which enclose the garage appeared for the first time ever in this set before going on to appear in a further 9 sets between 1976 and 1990.


With the notable exception of the modular buildings, most buildings which appear in modern sets tend to be open at the back, ostensibly to facilitate play, but also to minimise the parts count and hence the cost. Here, while the rear of the building is undoubtedly simpler than the front, it is at least enclosed, and efforts have been made to embellish the appearance of side and rear walls via the use of red 1 x 4 brick arches which only started to appear in sets the year this set was released.


With the building finished all that was left to do was to construct the Shell-branded petrol pump and attach it to the baseplate along with a 4 x 4 x 6 2/3 large pine tree and the figures. Lovely! While I have no doubt that the warm fuzzy feeling I experienced while inspecting the completed build was largely driven by nostalgia, it's undoubtedly an attractive set and still looks almost brand new; I picked it up from eBay almost 10 years ago as part of a job lot of older sets and can't believe how pristine most of the elements are.

368 Taxi Garage contains 156 elements and was released in 1976. At time of writing, complete boxed examples can be had for less than £30 plus shipping on Bricklink, and if you're willing to forego the box then you'll potentially pay less than £20. Bargain!

Unfinished Business

$
0
0
Back in the summer of 2019 I revealed that I'd be exhibiting my 10224 Town Hall-inspired railway station MOC (below) as part of a collaborative display at the 2019 Great Western Brick Show, but that it'd need some fairly substantial modifications in order to fit into the display.


The display, a LEGO city made up of fan-designed modular-style buildings complemented by brick-built roads, roadside structures, a canal and appropriate landscaping, would also feature a working passenger railway. The plan was for the railway to be elevated for part of its course, and Simon the display organiser asked if I'd be willing to modify my MOC to incorporate a platform at the rear in order to serve the elevated section of track. This seemed like an interesting challenge so I agreed. Simon sent over some specifications and a few photographs to illustrate how my station would fit into the overall display, including the exact dimensions of the plot it would occupy and how high the platform needed to be, so I got to work. As usual I worked in LDD, modifying a previous LDD file to reflect the new design brief, and eventually I came up with the sketch below.


As you can see, my plan was for the elevated section of railway to run on top of the ground floor of the building, which would mean that I had to extend the ground floor backwards to a considerable extent. The roof of the new, extended ground floor section would serve as the track bed, meaning that it would have to bear the weight of the track and train and be constructed accordingly. I'd also need to build a station platform at second floor level and attach a canopy a suitable height above it. The 16 x 6 area of open studs at the rear and to the side would eventually accommodate a bridge support, carrying the rail track from a bridge onto the station. From a purely technical perspective the build would be pretty straightforward, but the existing rear of the station (below) would nevertheless require substantial modification.


After double- and triple-checking that my design would fit the specified dimensions I sent an LDD screengrab to Simon for his approval, and after a bit of back-and-forth he was happy with it and I had the green light to get cracking with the modifications. To my surprise it turned out that I already had most of the LEGO elements that I needed for the build, but there were inevitably a few parts that I didn't have. This necessitated a gratifyingly small, if depressingly expensive, Bricklink order. Still, at least the parts arrived quickly and in perfect condition, so I was soon ready to build. It was the first meaningful LEGO project that I'd undertaken for a while on account of work, holidays and family commitments and it felt great to get my head down and do some building, so much so that I really got into it, burned the midnight oil and managed to complete most of the work in just a couple of nights.


As you can see from the picture above, I didn't make any modifications to the front of the building. The rear (below) was however much altered. I followed my LDD sketch pretty much to the brick, although I did make a couple of additional minor tweaks at the end, supporting the floating platform canopy with four lengths of black rigid 3mm hose and swapping out the old window sills with tan 2 x 4 tiles to make them look a bit less chunky. The building remains modular and splits into four sections, namely the expanded ground floor complete with track bed, the second floor which includes the station platform, a third floor to which the canopy attaches, and the roof which features the clock tower.


With the modified station now complete my next job was to figure out how to get it to the Great Western Brick Show venue in Swindon intact, and transporting it turned out to be a bigger challenge than I had anticipated. While the upper levels of the building just about squeezed into a large plastic crate, the expanded lower level was too big to fit into any box or crate that I owned or could lay my hands at short notice. I therefore ended up having to wrap it in a bed sheet and shoehorn it into the pitifully inadequate boot/trunk of my car and just pray that it survived the 80 mile journey without disintegrating, which it thankfully did, just about. Simon had arrived at the venue the previous evening, as had many of the other exhibitors, so the display was already in an advanced state of completion when I arrived at the venue on the morning of the show. All that was left for me to do was drop the station into the vacant plot, stand back and admire the view.


My station was assigned a nice central position in the display. Thanks to some impressive planning by Simon the station was flawlessly integrated into the display's rail loop by way of a pair of elegant dark green railway bridges complete with tan bridge supports which flanked the station on either side as you can see in the picture above. The narrow pavement in front of the station conceals electrical wiring which supplies a number of working LED street lamps, and beyond the pavement lies a section of brick-built road, some more pavement, and then a canal which is spanned by a pair of brick-built humpback bridges. A small courtyard completely enclosed by a number of buildings lies to the rear of the station beyond the rail track (below).


In addition to the integration of new features such as a working railway loop, an automated level crossing and LED street lights, the display had also physically expanded to a significant degree since its debut appearance at the 2018 Great Western Brick show. Click on the image below for a brief video tour of the city; if you're having difficulty viewing the embedded video then click here to watch it on Flickr or here to watch it on YouTube.


To my knowledge there aren't any plans to display the modular city at any further events. Even if future displays materialise I'd probably be hesitant to include my station as I don't think it's ideal for the same MOCs to keep appearing at multiple events over an extended period. It's therefore time for my station to come home and once again grace my own MOC City Layout. That'll mean that a lot of the recent changes will need to be reversed in order for the station to fit into its allocated space, but hey - it's all part of the fun!

Stay at home if you can, and keep safe.


Poor Relation?

$
0
0
OK, so I don't need anyone to remind me that I haven't exactly been prolific over the past few years when it comes to posting on Gimme LEGO.... That having been said, what I have posted provides a big clue to the identity of possibly my greatest passion when it comes to LEGO, namely space sets. A quick skim of the index of previous posts reveals that even if you exclude Star Wars I've served up significantly more reviews of space sets than of any other theme; vintage space sets such as 924 Space Cruiser, 6896 Celestial Forager and 6897 Rebel Hunter have been particularly well represented. A recent trawl through some of those old reviews whetted my appetite for more, so I thought I'd dig out an old space set from a subtheme that I'd not previously covered on Gimme LEGO and share it with you.


6900 Cyber Saucer was released in 1997 as part of the UFO subtheme of LEGO Space. The front of the box (above) looks frankly psychedelic, showcasing the completed craft flying above a green quasi-organic planet surface which is almost as retina-searing as the trans-neon green accents of the ship itself. Blurred clouds of magenta space dust and stars provide a suitably vivid backdrop. The back of my bashed box (below) is dominated by images of a couple of dubious-looking alternate builds. There are also a couple of panels which illustrate play features of the set, namely a rotation function and what appears to be a temperature-sensitive print on one of the elements.


The front of the instruction booklet (below) features the same image as the front of the box, but with one interesting difference, specifically the inclusion of an alternative set number (6999) alongside the actual set number. I initially assumed that 6999 was the number of the set in the US or elsewhere, but it turns out that 6999 was in fact the set number of a limited edition bundle consisting of a copy of 6900 plus a hard plastic promotional mask. The instruction booklet comprises 15 pages, all of which are occupied by building instructions; there's no advertising, which is always a bit of a shame in older sets, while the back cover is pretty much identical to the back of the box and therefore not shown here.


The set contains a solitary minifigure, designated as UFO Zotaxian Alien - Blue Officer (Commander X) by Bricklink. This minifigure only appears in a single set, 6975 Alien Avenger, in addition to 6900 and 6999. The torso and legs, with their intricate prints, are exclusive to this minifigure. The black breastplate and shoulder protector is shared with a number of other minifigures across the UFO and Insectoids space subthemes, while the light grey printed helmet is shared with a UFO Zotaxian Red Pilot minifigure which appears in a number of other UFO sets.


Beneath the Predator-esque helmet is a printed trans-neon green minifigure head. As was the case for the printed torso and legs, the head print is exclusive to this particular minifigure. There's no back print on the head.


The breastplate and shoulder protector also provides substantial protection for the upper back. In marked contrast to the extensive and complex printing on the front of the minifigure there's no printing at all on the back of the helmet, torso or legs.


Moving on to the saucer, the shape is largely defined by four 10 x 10 x 2 1/3 quarter saucer top panels. Two of these panels are trans-neon green in colour and have appeared in just 4 sets including this one and 6999, while the other two are printed old grey left and right variants which have each appeared in a total of 5 sets. The orange, black and silver prints on the latter two elements are great, featuring a stylised representation of the alien minifigure helmet from above together with some additional detailing. The quarter panels surround a simple brick-built cockpit containing a solitary red seat. A couple of decorative black 8.5L flexible hoses attach to the sides of the cockpit beneath the panels, while a pair of 3 x 5 deltoid panels attach to the outside edge of the saucer on opposite sides. Given the shiny silver stickers which are attached to them I suspect that they're supposed to be solar arrays. In addition to the deltoid panels, the exterior of the saucer is embellished with numerous other attachments including trans-neon green 8H whip antennae, black 4 x 4 inverted dishes, a minifigure loudhailer tipped with a trans-neon green 1 x 1 cone, and a minifigure space scanner tool. All of the attachments can be either rotated or tilted on small hinges, thus boosting the play value.


The cockpit is enclosed by a trans-neon green 6 x 6 octagonal canopy which is hinged at the rear to provide easy cockpit access. A black 2 x 2 round tile sits on top of the canopy. This tile is decorated with a heat-sensitive sticker, which is something that I've never encountered in a LEGO set before. When the sticker is cold the central area is blank, but when the sticker is pressed and warmed with a fingertip a dark green pattern appears in the central area. This 'play feature' is demonstrated in the instruction booklet (below). The sticker in my copy of the set shows a faint olive green pattern even when untouched, however, similar to what you can see here; I'm not sure whether that's because the ambient temperature is currently quite high in my LEGO room, or just because the sticker is now at least 23 years old and therefore not operating quite as efficiently as it was when it was new.


The saucer sits on top of a simple landing stage. This is supported at its periphery by four light grey bi-level wings and centrally by a pillar which incorporates four black 2 x 2 x 2 stands. The bi-level wings are quite rare in light grey, having appeared in just four sets in this colour including 6900 and 6999. There's a black 2 x 2 x 2 container mounted on one of the peripheral supports. The open face of the container is enclosed by a trans-neon green door which opens to reveal a printed tile that's presumably supposed to represent tech of some sort. The landing stage is topped by a red 4 x 4 turntable with square base.


The neon-green and light grey elements incorporated into the landing stage provide some welcome consistency with the saucer's colour scheme. The saucer fits neatly on top of the landing stage, and since the only point of attachment is the 4 x 4 turntable it can consequently rotate freely through 360 degrees.


I have to admit that I was initially quite sceptical about this set, and was ready to pretty much write off the UFO subtheme as a poor relation of the much-loved Classic Space sets of the late 1970s and early to mid 1980s. The colour scheme is less appealing to me than the palette of the older space sets, and the preponderance of large, prefabricated elements such as the 10 x 10 quarter panels and the landing stage supports made the build all too brief and had me wishing that I had chosen to assemble a set which didn't rely so heavily on such short-cuts. Now that I've built it, however, I'm feeling a little more charitable - I like the minifigure, the saucer is more swooshable than I expected, and the build is crammed with play features - literally everything attached to the upper surface of the saucer can be tilted or rotated and the saucer spins freely on its landing stage. Furthermore, the design does a decent enough job of aping the cliched flying saucer stereotype, and I'm mindful that there are probably legions of twenty-somethings out there who look back misty-eyed at the UFO sets of their youth the same way as older AFOLs revere the Classic Space sets.


Set 6900 Cyber Saucer contains 114 parts and was released back in 1997. There's clearly love for the set out there as at time of writing the cheapest complete boxed example of the set is listed at almost £50 plus shipping on Bricklink. Complete unboxed examples start at about half that, however, and you might also be able to find one cheaper on eBay.


Viewing all 135 articles
Browse latest View live